Dollhouse Shaker Kitchen DIY

This tutorial may depart from my usual content a bit. First, I would not consider a dollhouse kitchen beginner-friendly. Second, kitchens should be customized to your specific room measurements, so my exact kitchen layout may not be helpful to you! However, in my usual fashion, I snapped some photos as I figured out the DIY process for my own dollhouse. Perhaps it gives you inspiration and a little bit of the construction steps to build your own dollhouse kitchen!
In an effort to be slightly easier, this kitchen does not have working drawers or doors.
Materials
Basswood - I used 1/8” and 1/16” thick sheets most commonly (not balsawood!)
Sandpaper
Spray paint (I used Rust-Oleum Satin Smokey Beige)
Modge Podge, or watered down white glue
Seed Beads
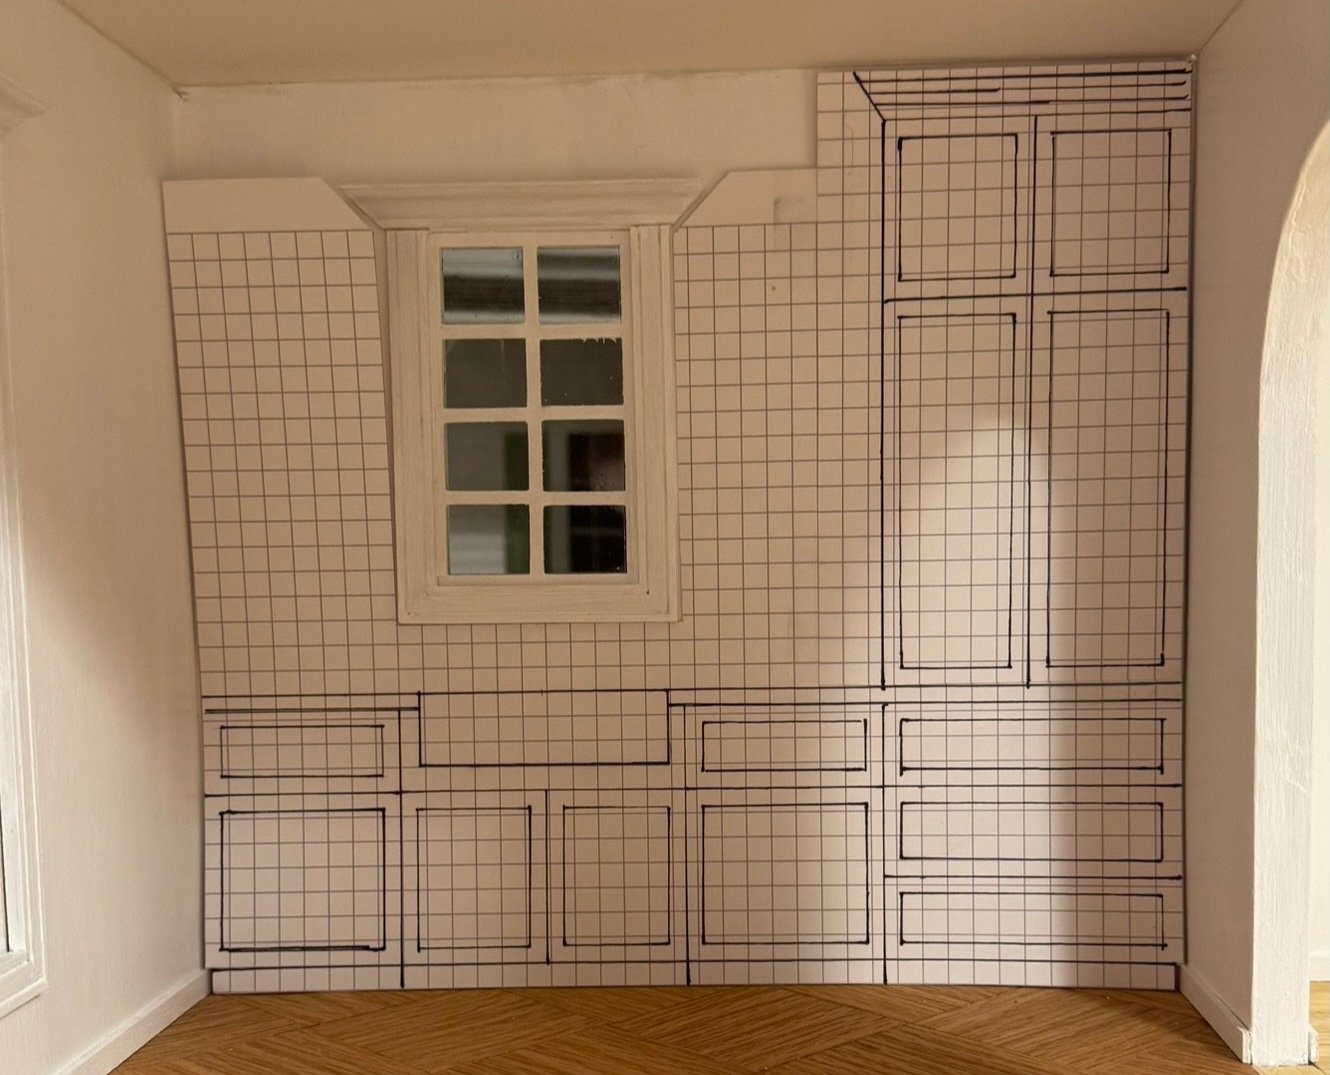
Plan the Kitchen
I find graph paper with 1/4” squares to be extremely helpful when planning out my dollhouse. If you don’t have graph paper on hand, you can print out your own from many free online resources. Cut your paper to fit along the wall, then draw up your dream kitchen to scale. I used 3” for counter height, and each drawer was about 7/8” tall. Your individual cabinet box width will vary based on your space.
Cabinet Base
First, construct a box out of the 1/8” thick basswood. My kitchen space was about 9 7/8” wide. The final counter height should be 3 inches, so take off about 3/8” to account for the countertop and toe kick. My front/back pieces measured 9 3/4” x 2 5/8” for example. Standard counter depth is 2 inches, so cut your side pieces to be 1 3/4” x 2 5/8”.
Cut out a spot for the sink if you are doing an apron style sink. My sink notch measured 1.5cm x 6.5cm (I switched to centimeters for the sink since it was the closest measurement on my ruler. It’s a little over 2 1/2 inches wide.)
Basswood Cutting Tip: If cutting along the grain of the basswood, you can often use a sharp box cutter and metal ruler to get a straight edge. For cuts perpendicular to the grain, it’s easier to use a miter box and hand saw.
Tape your cabinet box together and make sure it fits within your space. Note that I had to work around the baseboards, so you’ll see a gap underneath my cabinets. I built a toe kick out of 1/4” strip wood to fill this gap.
You can cut a countertop from the 1/8” basswood. It should be flush along the sides and back, but overhang the front by about 1/8”.


Shaker Cabinet Fronts
Shaker style kitchen cabinets are the easiest to make and look great! You just need a lot of wood strips and then to arrange them into small boxes. I drew my cabinet layout directly onto the flat cabinet front as a guide. The shaker frames should be 3/16” wide. I found this size to look the most proportional. I used the wood I had on hand and cut out a bunch of 3/16” wide strips along the grain of a thin basswood piece. You could probably buy strip wood in the correct size if needed — I just did it the hard way.
Cut out frames for each drawer and door you need. Glue these onto the flat face of the cabinet using wood glue and following the grid you made.
Fill the joints with wood filler, but be sure to clean out the gaps between the adjacent doors or drawers. Sand the wood filler down once dry.
I assembled my cabinet boxes and added some small supports on the top, next to the sink.


Paint and Sand, and Paint Again
I used spray paint on my dollhouse cabinets to get a smoother finish. Start with a primer, sand lightly after it’s dry, and then do two coats of your final paint.
I used Rust-Oleum Satin Smokey Beige for my kitchen.
Dollhouse Apron Sink
You can buy a dollhouse sink if needed, but inset sinks are not too terrible to make! My sink measurements were (in metric again):
Front: 19mm x 67mm
Sides (2): 15mm x 36mm
Back: 15mm x 63mm
For the apron sink front, sand down the edges to make 3 slightly rounded edges. Glue all four pieces together, then trace out a sink bottom to glue inside.
Sand, paint, sand, and paint your apron sink.
Note, I used wood filler on the inside sink gaps but I don’t think it made a noticeable difference. Feel free to skip that step.


Dollhouse Countertop
Check to make sure your countertop piece still fits nicely on the cabinet box and sink. You will cover this counter with printer paper. I usually Google a countertop texture I like, or use this Architextures Website to generate any surface you want. I used the Larvikite texture for my kitchen. Print this out on cardstock or regular paper.
Using modge podge or watered down white glue, spread a thin layer of glue across the top of the wood countertop. Adhere your paper texture to this, folding the paper edges around and gluing on the bottom as well. Glue this to the top of your cabinet base. Note, I was worried about the inside edges of the sink peeking through, so I colored them with sharpie before glueing the paper on.


Kitchen Hardware
I like to use beads for drawer and cabinet door knobs. In the past I have made draw pulls with wire, but beads are much easier. I found these small matte black seed beads at Hobby Lobby. I glued them straight onto the painted wood using E6000 glue.


Dollhouse Kitchen Reveal
I was mildly dreading this kitchen build, but overall, it went better than I expected! I opted to make my cabinets removable too so I can use this room for other ideas later in the future.